Steps in Building a Foundation
- Apr 20
- 5 min read
A strong foundation is the backbone of any building. It supports the weight of the structure and ensures stability, safety, and durability. A poorly constructed foundation can lead to cracks, uneven settlement, or even structural failure. Understanding the steps in building a foundation is essential for civil engineers, masons, contractors, and homeowners looking to construct a safe and long-lasting building.
This guide explains the process of building a house or commercial foundation in detail, covering planning, excavation, material preparation, reinforcement, pouring, and curing, along with tips to avoid common mistakes.
Understanding the Foundation in Construction
The foundation is the lowest part of a building that transfers loads from the structure to the ground. It must be designed to:
Support vertical loads (dead load and live load)
Resist horizontal forces (wind and seismic activity)
Prevent settlement and tilting
Ensure durability and safety
Foundations can vary depending on building size, soil type, water table level, and load conditions. Common types include shallow foundations (isolated, combined, strip, or raft footings) and deep foundations (pile foundations).
Step 1: Site Survey and Soil Investigation
The first and most critical step in foundation construction is site survey and soil investigation. A professional survey determines the building layout, contours, and soil characteristics.
Activities in this Step:
Conducting a topographical survey
Checking soil type (clay, sand, silt, rock)
Determining bearing capacity of soil
Identifying groundwater levels
Locating obstacles, underground utilities, or soft zones
Importance:
The foundation design depends on soil strength. Weak or uneven soils may require deeper footings, pile foundations, or soil stabilization before construction.
Step 2: Foundation Planning and Design
After understanding the soil, engineers prepare a foundation plan. This step involves:
Determining footing type (isolated, combined, raft, pile, etc.)
Calculating dimensions and depth of footings
Planning reinforcement layout for footings and beams
Aligning columns and walls with the overall structural plan
Considering drainage to prevent water accumulation
A detailed plan ensures uniform load distribution, structural safety, and long-term durability.
Step 3: Excavation of Foundation Trenches
Once the design is finalized, the next step is excavation. Excavation creates trenches or pits for footings and foundation elements.
Key Points:
Excavation depth depends on soil type, building load, and frost depth
Width must allow reinforcement placement and concrete pouring
Trenches must be level and free of loose soil
Temporary supports may be needed for deep excavations
Proper excavation ensures a stable base and prevents future settlement problems.
Step 4: Laying the Base or PCC Layer
A lean concrete layer called Plain Cement Concrete (PCC) is laid at the bottom of the excavation before reinforcement. This layer:
Provides a smooth, level base
Prevents direct contact between steel reinforcement and soil
Helps in load distribution
Typical PCC mix is 1:4:8 (cement:sand:coarse aggregate) with 75–100 mm thickness. PCC is allowed to set before placing reinforcement.
Step 5: Layout
Proper layout should be done before placement of reinforcement for the sctions of the foundation.
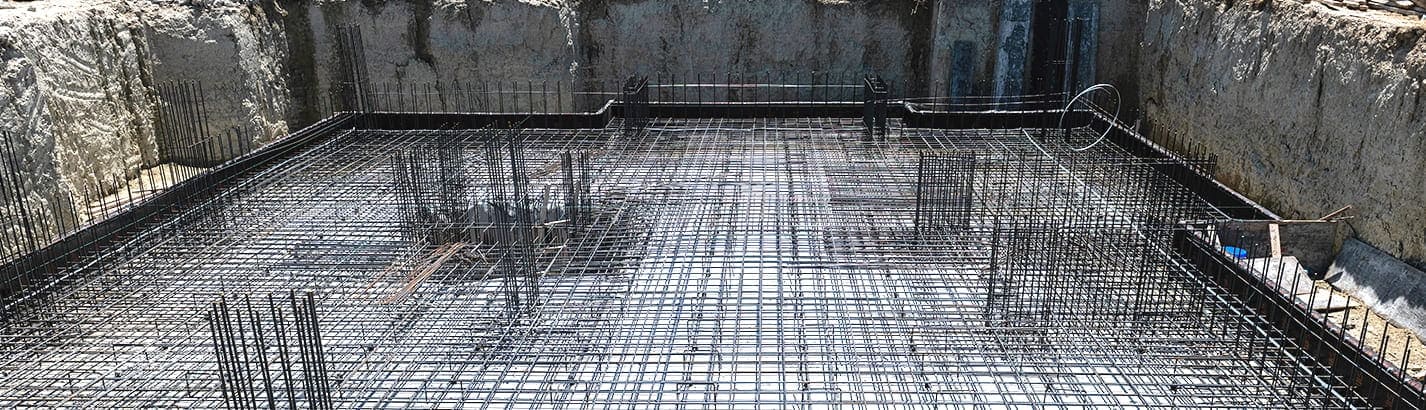
Step 6: Reinforcement Placement
Reinforcement strengthens the foundation against bending, shear, and tensile stresses. Proper placement ensures structural stability.
Guidelines for Reinforcement:
Use steel bars of appropriate grade and diameter
Maintain proper cover to prevent corrosion (usually 50 mm for footing)
Tie bars firmly with binding wire to avoid displacement during concreting
Follow the structural drawing for spacing, lap length, and column connections
Reinforcement design depends on building load, soil type, and footing type.
Step 7: Formwork or Shuttering
Shuttering or formwork shapes the foundation and holds concrete in place until it gains sufficient strength.
Best Practices:
Use strong, level, and leak-proof materials like plywood, steel, or timber
Ensure alignment and dimensions match design specifications
Apply formwork release agent to prevent sticking
Secure joints to prevent bulging under concrete pressure
Proper formwork ensures uniform foundation dimensions and smooth surfaces.
Step 8: Concrete Mixing and Pouring
Concrete forms the main body of the foundation. Correct mix, placement, and compaction are vital for durability.
Concrete Mixing:
Pouring Guidelines:
Pour concrete continuously to avoid cold joints
Use mechanical vibrators to compact and remove air pockets
Pour in layers for deep footings, ensuring each layer is compacted before the next
Poor pouring can lead to honeycombing, weak spots, and structural failure.
Step 9: Levelling and Surface Finishing
Once concrete is poured, the surface must be leveled and finished:
Use a straight edge or screed to remove excess concrete
Ensure the top surface is flat and level for column placement
Avoid over-troweling, which can bring water to the surface
A smooth and level foundation surface is crucial for proper column alignment and wall construction.
Step 10: Curing the Foundation
Curing is one of the most critical steps in building a foundation. Proper curing ensures concrete gains full strength and durability.
Curing Methods:
Sprinkling water continuously for 7–14 days
Covering with wet hessian, gunny bags, or plastic sheets
Using curing compounds in some cases
Insufficient curing can result in cracks, reduced strength, and long-term settlement issues.
Step 11: Foundation Inspection and Approval
After curing, the foundation is inspected before proceeding with superstructure construction.
Inspection Focus:
Dimensions, levels, and alignment
Reinforcement placement
Concrete quality and strength (cube tests if required)
Proper curing and absence of cracks or voids
Approval from engineers ensures that the foundation meets design and safety standards.
Step 12: Backfilling and Compaction
After inspection, trenches around the foundation are backfilled with soil.
Guidelines:
Use well-compacted layers to prevent future settlement
Avoid placing debris or loose soil
Maintain proper drainage around the foundation
Backfilling completes the foundation stage and prepares the site for walls or slabs.
Common Mistakes in Foundation Construction
Ignoring soil investigation before construction
Incorrect footing type selection
Poor reinforcement placement
Excess or insufficient water in concrete
Inadequate curing or compaction
Skipping inspection before backfilling
Avoiding these mistakes ensures a safe and long-lasting foundation.
Final Thoughts
Building a foundation is a step-by-step process that requires precision, planning, and adherence to engineering standards. From soil investigation to excavation, reinforcement, concrete pouring, and curing, each stage directly affects the building’s stability and lifespan. A well-constructed foundation supports the entire structure, prevents cracks and settlement, and ensures safety for years to come.
Following the correct sequence, using quality materials, and performing proper inspection is crucial for both residential and commercial construction projects. Whether it’s a small house or a multi-story building, a strong foundation lays the groundwork for durability and performance.

Cookies help us display personalized product recommendations and ensure you have a great experience.
Accept Cookies