A Practical Guide to Floor Screeding
- Oct 17
- 5 min read
In home construction, a floor that looks flat often hides the careful steps needed to make it truly level, firm, and ready for finishes. For any residential project or commercial build, Floor Screeding ensures a comfortable, uniform surface without dips or bumps. It is an investment in quality supporting long-term performance, clean aesthetics, and predictable installation for floor finishes.
What is Floor Screeding?
Floor Screeding is the application of a cement–sand–water mixture over a subfloor to create a smooth, level base for the final floor finish. A proper mix design yields a dense, durable layer that tolerates foot traffic, imposed loads, and temperature cycles. Depending on performance needs, portland cement may be used for strength, cohesion, and resistance to wet and thermal cracking. Far more than “trowelling on a mortar,” screeding influences how well the finished floor performs over time in homes, offices, shops, and renovations.
Types of Floor Screeds
A brief overview of the common systems helps in choosing the right build-up for use, load, and thickness.
Bonded Screed
Laid directly onto a sound concrete substrate using a bonding slurry or adhesive, this screed is ideal when high loads are expected and a thinner section is required. Typical thickness ranges from 15–50 mm. It suits high-traffic zones and locations with cast-in heating pipes, provided the substrate is well prepared for adhesion.
This type of screed is easier to repair and allows better level control with panel size of maximum 2-meter length.
Unbonded Screed
Placed over a polythene Damp Proof Membrane (DPM) rather than being bonded to the base, unbonded screeds limit moisture-related issues and substrate movement transfer. They are generally thicker usually above 50 mm and are chosen when separation from the base is desirable.
Floating Screed
Installed over thermal or acoustic insulation with a slip membrane between insulation and screed, floating systems improve comfort and energy performance. They are typically thicker and 65 mm is common to maintain rigidity and load distribution, especially where insulation is part of the build-up.
Heated Screed
Designed for underfloor heating, these screeds are often more flowable to fully encapsulate pipes, promoting efficient heat transfer and protecting the system. The continuous contact reduces voids, improving responsiveness and reducing risk of localised thermal cracking when combined with suitable controls and curing.
Monolithic Finish
The topping is laid fresh over fresh base concrete and it is quite economical and strong but difficult to repair. Thickness required is less due to better bonding.
What is the purpose of screeding?
A well-designed screed delivers a level base for tile, wood, vinyl, carpet, or stone, distributes loads uniformly, protects the structure by limiting moisture ingress, supports efficient underfloor heating, and reduces lifecycle costs by lowering the risk of rework, patching, or premature floor failure. The visual result is a flat, consistent finish.
How to apply screed to floor? The step-by-step process
A clear, sequential approach to screeding a floor improves quality and ensures consistency. Here’s how it should be done:
1) Surface Preparation
Inspect the subfloor for soundness, cleanliness, and moisture. Repair cracks and remove contaminants. Where needed, install a DPM. For bonded systems, mechanically roughen the concrete and apply a compatible bonding agent.
2) Mixing and Laying
Batch the screed with cement, sharp sand, water, and any specified additives to the required consistency per the selected mix design. Place in manageable bays and spread evenly with a trowel or screed bar. Base concrete generally have leaner mixes (e.g 1:3:6), while the topping is of richer mix ( e.g , 1:2:4 or 1:2:3.5 for better workability)
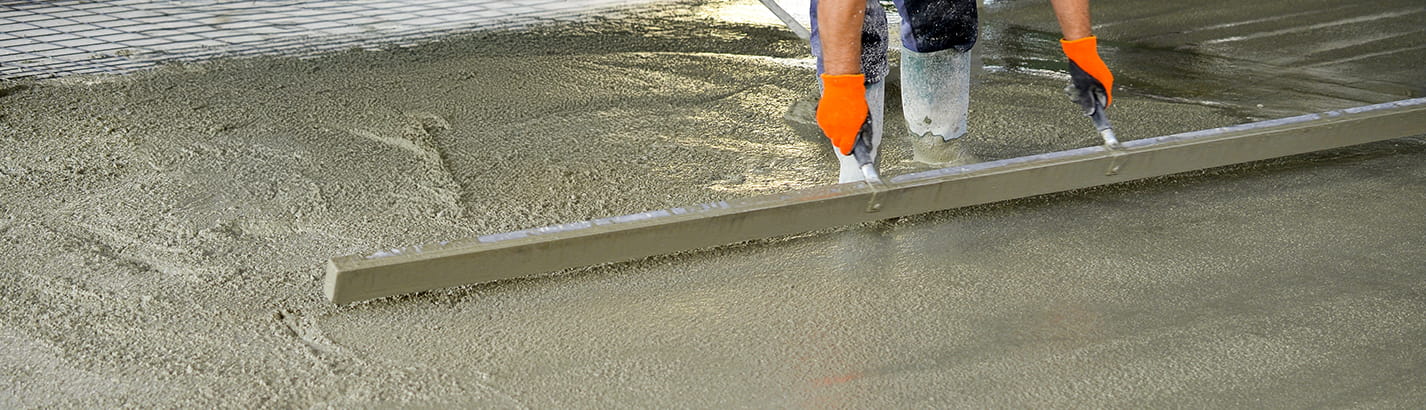
3) Levelling and Compaction
Compact to expel air and achieve density. Use a straightedge in a steady, sawing motion to achieve line and level. Check datum points and joints to maintain uniform thickness.
4) Curing
Protect from premature drying and loading. Maintain appropriate moisture for the initial curing period so the screed gains strength and reduces shrinkage risk. In fact, the curing is essential for durability & wear resistance.
Key Factors to keep in mind for Floor Screeding
Good outcomes depend on disciplined basics and when it comes to screeding a floor, there are a few things that one should keep in mind:
Preparing the surface: Poor cleaning or unrepaired defects weaken bonding. Address cracks and remove dust, oil, and laitance.
Proportioning: Incorrect mix ratios reduce strength and durability. Follow manufacturer guidance or use approved pre-mixed screeds.
Quality of Application: Inadequate compaction or uneven strike-off leaves voids and ripples. Make sure to use proper tools and techniques.
Shrinkage control: Drying shrinkage can create fine cracks so consider polypropylene fibres and edging foam in the mix to avoid shrinkage.
Curing conditions: Rapid drying promotes micro-cracking. Keep temperature and humidity stable during curing.
Surface Hardening: Optional use of sodium silicate or proprietary compounds to reduce dusting.
Slip Resistance: Trowel finish is non-slip, chequered patterns recommended for ramps/stairs.
Innovations in Floor Screeding
There are some innovations in Floor Screeding that improve precision, speed, and design flexibility. These are:
Laser screed systems: They deliver precise levels, improving flatness and consistency.
3D printing approaches: These enable custom textures and patterns in designated areas.
Automated screeding robots: These robots use sensors and algorithms for consistent placement and finishing, thus reducing the need for manual labour.
Rapid-drying and rapid-curing screeds: These screeds shorten waiting times and improves the speed of construction process.
When screeding in construction is correctly done, it helps provide a flat, strong base that resists cracking and moisture, spreads loads evenly, and supports thermal insulation. Therefore selecting the right system, following a proper mix design, and using quality materials paired with careful preparation, placement, and curing leads to durable floors and reliable results in home construction. Moreover the performance related to durability depends upon aggregate quality, water cement ratio & compaction also.

Cookies help us display personalized product recommendations and ensure you have a great experience.
Accept Cookies