Concrete Honeycombing: What It Is, Why It Happens, and How to Fix It
- Aug 20
- 4 min read
In construction, not all surface imperfections are harmless. One defect that often looks minor but can cause major issues over time is concrete honeycombing. If you’ve ever noticed rough, patchy, or hollow areas on a concrete surface, that’s likely honeycomb, and it’s more than just a cosmetic problem.
This blog will walk you through what concrete honeycombing is, how it connects to segregation in concrete, and what steps you can take for honeycomb concrete repair.
What Is Concrete Honeycombing?
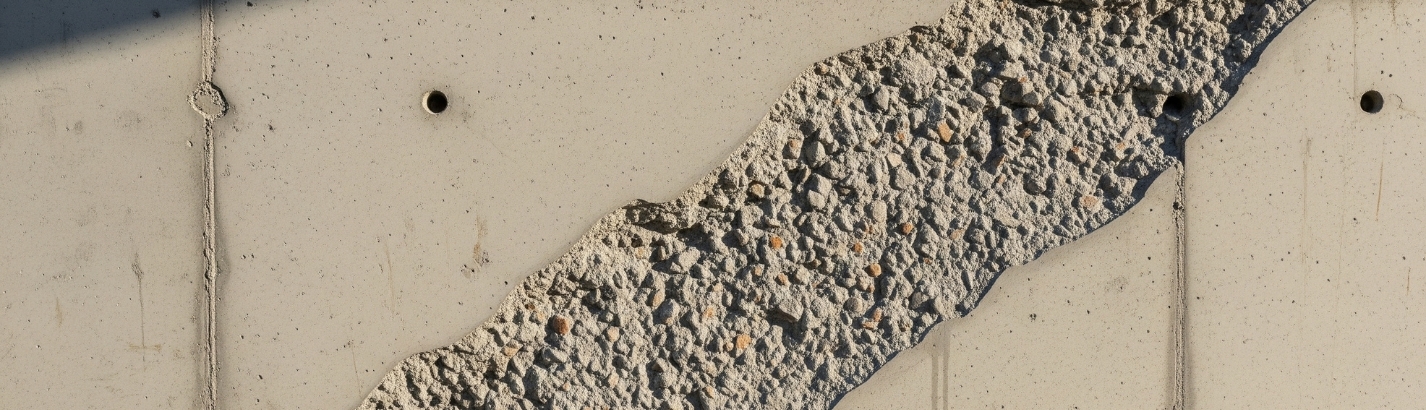
Concrete honeycombing refers to voids or air pockets that appear when the concrete fails to fill the spaces between formwork and reinforcement. These voids expose coarse aggregates, leaving behind a stony, irregular surface that resembles a natural honeycomb, hence the name.
These defects may appear on the surface, inside the concrete, or both. While surface honeycombing affects appearance, deeper voids can compromise structural strength and durability.
Why Honeycombing Happens: Common Causes
Concrete honeycombing doesn't just happen randomly. It’s usually caused by issues during mixing, placing, or compaction. Here's a closer look at the most common culprits:
1. Segregation in Concrete
Segregation happens when components of the concrete mix separate, cement paste moves away from aggregates, or coarse aggregates settle unevenly. This disrupts the uniformity of the mix and leaves empty spaces during compaction.
Typical causes of segregation include:
Dropping concrete from excessive heights
Over-vibration
Using mixes that are too wet or too dry
Poor mix design
Segregation is often the root cause behind honeycombing.
2. Poor Compaction
Even with a good mix, failing to properly compact the concrete allows air pockets to remain. These unfilled spaces eventually become honeycombed areas. Manual compaction in congested zones is often insufficient, and poor vibrator use only adds to the issue.
3. Reinforcement Congestion
When reinforcement bars are placed too close together, it becomes difficult for concrete to flow and compact around them. This is especially common in columns and beam junctions.
4. Low Workability
Concrete that lacks flow due to a low water-cement ratio or the absence of plasticizers won’t spread or settle into tight corners. This can result in incomplete filling of the formwork and surface voids.
Identifying Honeycombing: What to Look For
Surface honeycombing is easy to spot. It typically looks like:
Patches of coarse aggregate are visibly exposed
Irregular voids near the edges or corners of formwork
A rough or stony texture that contrasts with the rest of the concrete
For internal honeycombing (not visible), signs include:
Hollow sound when tapping with a hammer
Water leakage through structural members
Inconsistent or weak surface when applying finishes
Non-destructive testing methods, such as ultrasonic pulse velocity or rebound hammer tests, are used to identify internal honeycombing in critical structures.
Honeycomb Concrete Repair: Step-by-Step
Not all honeycombed areas need demolition. Depending on the severity, you can choose between surface patching or deep structural repair.
1. Repairing Surface Honeycombing
Suitable for: Minor, non-structural defects
Steps:
Chip away loose or weak concrete using a hammer and chisel.
Clean the area thoroughly to remove dust and debris.
Apply a bonding agent if necessary.
Fill the voids using a polymer-modified mortar or cement grout.
Finish with a trowel and allow proper curing.
2. Repairing Deep or Structural Honeycombing
Suitable for: Larger or load-bearing areas
Steps:
Remove all loose and damaged concrete until sound concrete is exposed.
Clean the surface and apply a suitable bonding primer (epoxy-based for structural zones).
Use non-shrink grout or micro-concrete to fill larger cavities.
Compact the material thoroughly to avoid secondary voids.
Cure the repaired area as per standard procedure for at least 7 days.
Important: If the honeycombing affects columns, beams, or load-bearing slabs, a structural engineer must assess the damage before repair.
Preventing Honeycombing: Best Practices on Site
Prevention is always better than repair. Here are practical steps to avoid honeycombing in the first place:
Use a Well-Proportioned Mix
Maintain a balanced water-cement ratio.
Use admixtures to enhance workability without increasing water.
Ensure Proper Compaction
Use mechanical vibrators at the right frequency and depth.
Avoid over-vibrating, which can cause segregation.
Avoid Segregation
Place concrete using chutes or tremie pipes for deep pours.
Never drop concrete directly from high points.
Design Accessible Formwork
Ensure the formwork is tight, well-oiled, and easy to fill.
Provide openings in complex sections to check placement and compaction.
Plan for Reinforcement Placement
Maintain proper spacing between bars.
Use spacers and chairs to hold reinforcement in position during concreting.
Final Thoughts
Concrete honeycombing is one of those problems that can quietly undermine the quality and strength of your structure. It’s often preventable with the right mix design, careful placement, and proper compaction.
If you notice honeycombing during inspection, act quickly. The earlier you identify and repair it, the better your chances of avoiding costly structural repairs or failures down the line.
Concrete may be strong, but only when every part of it is done right.

Cookies help us display personalized product recommendations and ensure you have a great experience.
Accept Cookies